Pages

Sunday, October 31, 2010

Garden Comparison

Its been fairly rainy the last few days, so I have been looking through my photos I have been taking and was gobsmacked at how far my garden beds had really come!

The first two photos are comparisons of my current two beds. The top photos were taken at the start of this competition [Sept 5th] and the bottom photos were taken today [31st Oct], which is approximately 2 months apart.

The transformation is quite amazing! You don’t really notice the difference each day, as things change so slowly.

In other news, my spinach pot is doing awesomely, and we’ve had a few harvests off of it already. I have planted another lot of seeds in the green house so I can continue cropping the spinach for a much longer period of time.

And more of my corn as come up!! WOOHOO! Finally some decent sucess with corn. I am seriously so happy. Both me and my partner love corn, and it was the one veggie we definitely wanted to grow. Typically it is the one thing I have had the most trouble with growing!

13 Day Candling

Only 8 days to go!!

I did my second candling of the eggs in my incubator and also did my first chuck out of dud eggs. I threw out 5 infertile eggs and 3 eggs with blood rings.

What I am currently left with is 16 viable and well developing eggs. I have 5 Gold Laced, 4 Silver Laced [show quality] and 7 Silver Laced eggs all developing nicely.

As I candled them, I could actually SEE the chicks inside moving around!! I will try to video the next candling [which will take place on day 18, which is the 4th of Nov] so people can see the chickens moving.

Compared to last candling, the eggs are so much darker.

Sunday, October 24, 2010

Day 7 Candling

Tonight I candled my eggs for the first time tonight.

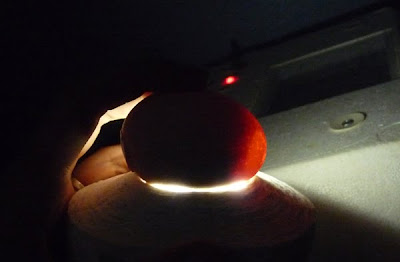
Candling allows you to see inside the egg to see the development of the chick inside. I use a super bright LED torch and a toilet roll [with paper on it] to balance the egg on and focus the light beam through the egg.

Out of the 24 eggs I have:

4 infertile
1 possibly infertile
3 bloodrings [started developing but died]
1 possibly developing
15 developing

A fertile and developing egg. You can see the veins and the developing chick [blob] I could actually see the little black blob moving!

An egg with a bloodring, means the egg started developing but for some reason stopped.


This egg is possibly infertile, but it is hard to say as the rest of the infertile eggs were much lighter in the centre but there doesn’t appear to be any veins or development going on.

Another fertile egg, you can see some veins in it, but I’m not sure this one will make it to full term, as the shell’s pores are so large, but I am hoping it will.

Monday, October 18, 2010

Incubating Eggs!


Finally Paul has said I can get chickens...it's only taken 18 months to convince him! I picked up my incubator on Friday and set it up to allow the temperature to stabilise. The eggs need a constant 37.7 degrees to hatch.

On Saturday, I took a lovely drive up to Hahndorf to meet the lady selling me 2 dozen fertile eggs. I also got the chance to meet the chickens who laid the eggs. Gorgeous birds!

I bought 9 Gold Laced Wyandotte eggs and 15 Silver Laced Wyandotte eggs [6 of which came from show quality birds] and let them sit for 24 hours before putting them into the incubator.

They went into the incubator around midday, after I labelled each egg with a number, date of lay and colour. So if all goes well, I’ll have fluffy baby chickens on the 6/7th of November.

In gardening news, my corn has yet again rotted. Time to buy new seeds I think.

Wednesday, October 6, 2010

Paper Seedling Holders

Yesterday I started to transplant all my tomato seedlings from the seed raising trays into tubes [I use toilet paper rolls]. Unfortunately I ran out of toilet paper rolls, even with three men in the house!! So I had to come up with some other way to make biodegradable seedling tubes without forking any money.

I came up with this. Paper seedling tubes. Made from old pieces of A4 paper [old bills, pamphlets, etc], they’ll biodegrade quicker than the toilet tubes once placed in the ground. And you don’t need glue or tape to hold them together.

They’re a little fiddly to make at first but once you get the hang of, they’re quite easy.

Fold a piece of A4 paper in half widthways. Unfold and fold in half lengthways. Leave folded lengthways.

Fold from the point on the centre crease where the halfway crease is, diagonally from corner to corner. Unfold the last fold.

From the end of the centre crease, fold the paper inside itself on the diagonal fold line. What you should have is a piece of paper with a taper starting from the centre of the length going to a point at the other end.

Now roll the paper into a cylinder shape. Then insert the point between the folds and coil it inside until none of the tapered section is showing. It takes a bit of practice to get it to stay there, but it will.

I have found you don’t need bottoms in the as long as you pack them well with soil and place them in a tray [mine are sitting in a cardboard tray we bought croissants in].